Monday, December 24, 2012

The Boys of Baking Volume IV: New Orleans Pralines

Hey everyone! In our latest edition of the Boys of Baking, Ryan joins his Grandmother and Aunt in New Orleans, Louisiana for some traditional holiday candy making.

Today's guest blog will trace the steps of making traditional New Orleans Pralines. Pralines are thought to have been a creation of a personal chef of 17th century French statesman César duc de Choiseul Comte du Plessis-Praslin. Some believe Plessis-Praslin would have the candies made for women he was courting. According to the story, he would put the sweets into individuals wrappings with his name "Praslin" on them and people eventually began to simply refer to the candies as Praslin's (Pralines). The original receipt used almonds, but when French settlers came to New Orleans, local Creole chefs began to substitute the almonds with the plentiful pecans that grew in southern Louisiana. Today's recipe is for Creole Pralines from a local New Orleans family.

New Orleans Pralines
1 cup sugar
1cup dark brown sugar
2 tablespoons of light Karo syrup
1/2 cup whipping cream
2 tablespoons of butter
1 teaspoon of vanilla extract
1 cup of pecans

1) Place the white sugar, brown sugar, Karo syrup, and heavy whipping cream in a sauce pan.
2) Dissolve the sugars, Karo syrup and heavy whipping cream over medium heat until it boils.
3) Continue cooking until candy thermometer registers to 228 Fahrenheit - stirring occasionally.
4) Once the temperature reaches 228 Fahrenheit, add the butter, vanilla extract and pecans.
5) Continue cooking over medium heat until it reaches 236 Fahrenheit.
6) Remove from heat
7) Cool to 225 Fahrenheit
8) Beat until sauce thickens - happens very quickly
9) VERY QUICKLY, drop candy on wax paper into 10 or 15 individual portions
11) Let cool
10) Sit back under your closest Magnolia tree with a cup of chicory coffee and a plate of your delicious Creole pralines and enjoy!

Monday, December 3, 2012

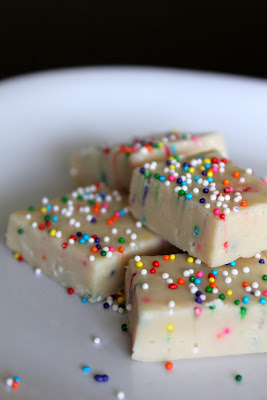
Funfetti Cake Batter Fudge Fail

I think I have a fudge curse. I haven't tried to make fudge in awhile because my last attempt saw me slaving away over the stove, sweaty and stiff-armed from stirring a pumpkin fudge that absolutely, resolutely refused to reach soft-ball stage. For anyone that's counting, that's 235-245 degrees on a candy thermometer.

When I came across this cute recipe recently, I thought it might be an easy way to ease back into fudge since it required NO stovetop time, and only microwaving. Easy as it sounds however, I guess this recipe didn't realize that I'm cursed. Despite microwaving the sweetened condensed milk and white chocolate chips for at least 4 minutes, these chips Would. Not. Melt. I ended up smashing most of them with the back of a spoon to get as close to a smooth consistency as possible.

Next, this recipe calls for three teaspoons of vanilla. 3. Not as much of a big deal if you're using grocery store, imitation vanilla. But if you're someone that likes to use the good stuff, this could get expensive. My problem wasn't cost so much as the fact that I only had brown vanilla extract, rather than clear. So, instead of having a nice, white cake look I had more of a beige/ecru/off-white cake look.

Finally, despite the picture I saw along with the recipe, the final product only makes a rather thin layer of fudge so, if you're looking for thick slabs of country-style fudge, you'll want to double the recipe. Oh, and in the end, it only sort of tasted like cake batter.


I always wonder whether to post recipe failures or not, but I figure it helps to show that not all the food you see online comes out perfectly the first time, and not all of us have the time, money and resources to continually throw out and remake recipes until they're just the way we'd like them. Or maybe I'm just cursed.

Funfetti Cake Batter Fudge
     from Pursuit Of Hippiness
1 14 ounce can sweetened condensed milk
3.5 cups white chocolate chips
3 tsp Vanilla Extract
1/2 tsp Almond Extract
Rainbow Sprinkles

1. Pour milk and white chocolate into a microwave-safe bowl. Heat for 2-3 minutes, or until white chocolate is almost completely melted. DO NOT OVERHEAT. Stir until completely blended, melted, and smooth.

2. Immediately add vanilla and almond and combine thoroughly. Add a handful or so of rainbow sprinkles and fold in quickly, because they will melt (and if they are stirred for too long they’ll turn the fudge an ugly muddy color).

3. Transfer to an aluminum-foil lined 8×8 inch baking pan for very thick fudge, or a 11X7 pan (recommended). Let set at room temperature or in the refrigerator.

4. Once set,  cut into cubes (and peel off the foil!). Store leftovers in an airtight container in a cool place.

Sunday, November 11, 2012

Cardamom Cranberry Pear Crisp

Hey everyone, please welcome back my mom for her latest and greatest guest blog post with this phenomenal fall dessert (and I'm not just saying that because of my feelings towards cardamom...)

If you love autumn but are tired of the pumpkin spice craze that erupts in October, cardamom Cranberry Pear Crisp may be the recipe for you. It was easy to make following the usual directions involved with making any fruit crisp.

I was totally unfamiliar with cardamom but since it's Hilary's favorite spice I knew I had to give this a try. First of all to paraphrase Hilary, "People, you really need to go to World Market for your spices." Cardamom at my grocery store ranged from $9 to $12 but was $3.99 at World Market.


I would call this an "Adults Only" dessert. What I mean by that is the cardamom gives this crisp a spicy flavor that smells amazing as it bakes and the tart cranberries keep it from being overly sweet. This is something I could serve at Thanksgiving to break up the monotony of the usual pumpkin and pecan pies.


It did surprise me in October that I had to go to 3 stores to find cranberries, finally having success at Whole Foods. I would recommend using firm pears. Two of mine were more ripe than the others and were on the mushy side when the crisp was done. Since I'm not a big fan of the peeling, coring and slicing involved, I was please to discover my apple corer worked equally well on the pears.


When I make this again I will add chopped pecans in the topping and have some vanilla ice cream handy!

Cardamom Cranberry Pear Crisp
     from The Columbus Dispatch

Topping:
1/2 cup butter (1 stick), at room temperature
1/2 cup packed brown sugar
3/4 cup flour
3/4 cup oats (old fashioned OR quick cook)
1/2 tsp cinnamon
1/4 tsp salt

Filling:
8 pears peeled, cored, and sliced
1 package (8 oz) fresh or frozen cranberries
1/2 cup packed brown sugar
1/2 tsp ground cardamom
1/4 tsp salt
2 Tbs cornstarch

1. Heat oven to 400 degrees. Coat a 9x9" baking dish with nonstick spray. To make the topping, in a medium bowl use an electric mixer to beat together the butter and brown sugar until creamy. Add the flour, oats, cinnamon and salt. Stir together until the mixture just form moistened crumbs and small clumps.

2. To make the filling, in a large bowl toss together the pears, cranberries, brown sugar, cardamom, salt and cornstarch. spread filling evenly in the prepared pan. Sprinkle to topping evenly over the filling. Bake for about 1 hour, or until the pears are tender and bubbling and the topping is well-browned.

Monday, October 29, 2012

Rootbeer Float Cake

My mother frequently laments that I never bake anything whenever I come home to visit. Because my brother is a rootbeer fanatic and veritable expert on all things root beer, I resolved to actually bake something on my last trip home and decided to try this Rootbeer Float Cake I'd seen on The Great Satan Pinterest as an homage to the end of summer.

For any of you who have attempted any recipes, sewing projects or, God forbid, DIY home improvements from Pinterest, you may be familiar with the infamous "Pinterest Fail" in which nothing ever comes out quite as pictured. Case in point, this will be the best chocolate bundt cake you've ever had. It will not taste like root beer.

Despite using rootbeer in both the frosting and the cake, there was unfortunately no discernable rootbeer flavor in the end product. However, this is BY FAR the moistest bundt cake I've ever had. Even after a couple of days the cake was still moist and fudgy, and I wouldn't hesitate to make this again to serve for any chocolate fiends. Similarly, the cake was awesome paired with a scoop of vanilla ice cream on the side, but just not what I was looking for.  If I made this again, I might try it with rootbeer extract instead to try to capture that summery flavor.


Alas, back to the Pinterest drawing board.


Rootbeer Float Cake
     from Brown Eyed Baker
2 cups root beer (do not use diet root beer)
1 cup dark unsweetened cocoa powder
½ cup (4 ounces) unsalted butter, cut into 1-inch pieces
1¼ cups granulated sugar
½ cup dark brown sugar
2 cups all-purpose flour
1¼ teaspoons baking soda
1 teaspoon salt
2 eggs

Rootbeer Fudge Frosting
2 ounces dark chocolate, melted and cooled slightly
½ cup (4 ounces) unsalted butter, softened
1 teaspoon salt
¼ cup root beer
2/3 cup dark unsweetened cocoa powder
2½ cups powdered sugar

1. Preheat oven to 325 degrees F*. Generously spray the inside of a 10-inch bundt pan with nonstick cooking spray, or butter the pan and dust with flour, shaking out the excess flour; set aside.

2. In a medium saucepan, heat the root beer, cocoa powder and butter over medium heat until the butter is melted. Add the sugars and whisk until dissolved. Remove from the heat and let cool.

3. In a medium bowl, whisk the flour, baking soda and salt together.

4. In a small bowl, whisk the eggs until just beaten, then whisk them into the cooled cocoa mixture until combined. Gently fold the flour mixture into the cocoa mixture. The batter will be slightly lumpy, which is okay. Do not overbeat it, as it could cause the cake to be tough.

5. Pour the batter into the prepared pan and bake for 35 to 40 minutes, rotating the pan halfway through the baking time, until a small sharp knife inserted into the cake comes out clean. Transfer the pan to a wire rack to cool completely. Gently loosen the sides of the cake from the pan and turn it out onto the rack.

6. To make the Root Beer Fudge Frosting, put all of the ingredients in a food processor. Pulse in short bursts until the frosting is shiny and satiny, scraping the sides of the food processor a couple of times. (If you don’t have a food processor, simply throw it all into the bowl of a stand mixer or a large bowl using a hand mixer and mix on medium-low until combined and satiny smooth.)

7. Use a spatula to spread the fudge frosting over the cake in a thick layer. Let the frosting set before serving. Store leftovers wrapped well or in an airtight container at room temperature.
*Note: If you are using a dark, nonstick pan, heat the oven to 300 degrees F.
 

Saturday, October 13, 2012

Oatmeal Cream Pies

If you're like me, you might think that there's no way that a homemade recipe could ever rival the taste of a true Little Debbie oatmeal cream pie.  Fortunately for both of us, we're both totally wrong.

When I first started seeing oatmeal cream pie recipes popping up across the interwebs, I was incredulous that anything I could make in my kitchen could achieve the moist, soft cookie or the signature filling flavor of the oatmeal cream pies of my childhood.

And, to be honest, the cookie is great but not exactly the same. But the filling...oh, the filling. It is amazing. It is perfect. It is Little Debbie without all the scary chemicals and preservatives. I did debate for awhile on which type of cookie recipe to use. Specifically, whether to go with one that would result in a puffy cookie that would make the sandwiches "look" better, or a flatter cookie that would better emulate the real deal. Clearly, you can see which I chose.

I used a Martha recipe for the cookies and, while it specifically calls for rolled oats rather than quick-cook oats, I only had quick-cook and all the other recipes I found called for this type as well. I didn't notice any issues, but can't say how they would have come out differently. Let me know if you try it!


The recipe also calls for using 2 Tablespoons of batter per cookie, which results in monster-size oatmeal cookies that are popular at bakeries these days (who eats that much cookie??) Anyway, I found 1 1/2 tablespoons to be much better and if you want 20-24 sandwiches, go ahead and reduce it to 1 Tablespoon.

A couple of notes: If you're smarter than me and already have a small cookie scoop, this would be the time to use it! Otherwise measuring out 1 1/2 Tablespoons of batter gets pretty messy.

Oatmeal Cookies
     slightly adapted from Martha Stewart 
     makes 13-18 sandwiches
1 1/2 cups all-purpose flour (spooned and leveled)
1/2 teaspoon coarse salt
1/2 teaspoon baking powder
1/4 teaspoon baking soda
1/4 teaspoon cinnamon
1 cup (2 sticks) unsalted butter, room temperature
3/4 cup packed dark-brown sugar
1/2 cup granulated sugar
1 tablespoon unsulfured molasses
1 teaspoon pure vanilla extract
2 large eggs
1 1/2 cups rolled or quick-cook oats

1. Preheat oven to 350 degrees. In a large bowl, whisk together flour, salt, baking powder, baking soda, and cinnamon. In another large bowl, using an electric mixer, beat butter, brown and granulated sugars, and molasses on high, scraping down bowl, until light and fluffy, 4 minutes. Add vanilla; beat until combined. Beat in eggs, one at a time, scraping down bowl after each addition.

2. With mixer on low, add flour mixture and beat just until combined. With a rubber spatula, stir in oats. Drop dough in 2-tablespoonful mounds, 2 inches apart, onto two baking sheets. Bake until cookies are just set at edges and slightly soft in middle, about 11 minutes, rotating sheets halfway through. Let cookies cool on sheets, 5 minutes. Transfer to wire racks and let cool completely.

Oatmeal Cream Pie Filling
     from Baked Perfection
2 teaspoons hot water
1/8 teaspoon salt
1 (7 ounce) jar marshmallow cream
1/2 cup vegetable shortening
1/3 cup powdered sugar
1 teaspoon vanilla extract
While the cookies bake prepare the filling. In small bowl, dissolve the salt in the hot water. Set aside and allow this to cool.  Combine marshmallow cream, shortening, powdered sugar, and vanilla in a bowl; mix on high until fluffy (3-4 minutes).  Add the cooled salt water and mix well.  Spread filling on flat side of one cookie, press 2nd cookie on top.

Monday, October 1, 2012

Martha Monday: Ginger Pumpkin Bread

Let the ubiquitous pumpkin recipes begin!! I have to confess that I'm a complete sucker for all things pumpkin. My favorite holiday is Halloween, and I can't get enough of the pumpkin spiced lattes, ice creams, pancakes, breads, pies and everything else that abound this time of year.

Like zucchini and banana breads, you might think that's there's not really much that can be done to revamp the traditional pumpkin bread. However, this might actually be my favorite pumpkin bread, and my new go-to recipe. I was somewhat surprised because, being a Martha recipe, it's actually surprisingly easy. For example, you don't need to peel, seed, and roast your own pumpkin. Who has time for that? Nope, this recipe just calls for scooping out pre-pureed pumpkin from a glorious can. Also, I love that this recipe isn't overly sweet. I'm used to pumpkin breads that essentially taste like pumpkin pie, but this loaf isn't overwhelmed with cinnamon, cloves, nutmeg and allspice--but only a slightly spicy hint of ginger that complements the pumpkin perfectly.


Ginger Pumpkin Bread
     from Martha Stewart
     makes 2 loaves

12 tablespoons (1 1/2 sticks) unsalted butter, melted, plus room-temperature butter for pan
2 1/2 cups all-purpose flour (spooned and leveled), plus more for pan
2 teaspoons baking powder
2 teaspoons ground ginger
1 teaspoon salt
1 cup granulated sugar
1 cup packed light-brown sugar
1 can (15 ounces) pumpkin puree (1 3/4 cups)
3 large eggs

1. Preheat oven to 375 degrees. Butter and flour two 8 1/2-by-4 1/2-inch (6-cup) loaf pans; set aside. In a large bowl, whisk together flour, baking powder, ginger, and salt. In a medium bowl, whisk together sugars, pumpkin, melted butter, and eggs; add flour mixture, and stir until just combined.

2. Divide batter between prepared pans. Bake until a toothpick inserted in center of loaves comes out clean, about 50 minutes. Let cool 10 minutes; invert pans and transfer loaves to a wire rack to cool completely. Glaze, if desired.

Sugar Glaze
1 1/2 cups confectioner's sugar

1. In a small bowl, mix confectioners' sugar with 2 to 3 tablespoons water until mixture is smooth but thick. Place waxed paper under rack for a quick cleanup. For easy pouring, transfer glaze to a liquid-measuring cup, and drizzle over loaves. Let dry 15 minutes before serving. Makes enough for 2 loaves.

Friday, September 21, 2012

Peanut Butter and Jelly Cupcakes, Cupcake Camp DC 2012

For other avid followers of the cupcake scene, you may already be familiar with Cupcake Camps. Originally designed as an informal gathering for cupcake lovers, the event has now gone global, spanning the US, Canada, Australia and Europe. Unfortunately, I was out of town for the first two iterations of Cupcake Camp DC, but this year I was finally able to throw my hat in the ring with my take on Peanut Butter and Jelly Cupcakes. With both amateur and professional categories, more than a dozen bakers contributed cupcakes for this year's event benefiting the DC Candlelighter's Foundation, and raising more than $2000 for the children's cancer foundation.

Despite a tornado warning and torrential downpour, lots of cupcake fans showed up to sample flavors like Lemon Lavender, Irish Cream, Spiced Caramel Apple, Cannoli, Spumoni and--the crowd favorite--Chicken and Waffles Cupcakes. After running a test batch of Peanut Butter Cupcakes past my coworkers, I decided to incorporate their suggestion of making both grape and strawberry-filled cakes, so that tasters could pick their favorite PB&J combo. Similarly, I topped a few with chopped peanuts for the chunky peanut butter devotees.


 Want to host a Cupcake Camp in your hometown? Check out the Cupcake Camp page for all the how-to details!

A couple of notes: If you decide to make these cupcakes--and I may be biased, but you totally should--you can also make these cupcakes using regular, all-purpose flour, just reduce the amount by 2 tablespoons (though the crumb texture won't be as soft). As for decorations, for the jelly drizzle I diluted some jelly with a tablespoon of water and used a plastic squeezy bottle. Just a bit of advice though--if you try to do this with strawberry jelly, you'll want to pass it through a mesh sieve first to remove the berry pieces. Trust me on this one.


Peanut Butter and Jelly Cupcakes
     adapted from Annie's Eats
     makes 18-22 cupcakes
2 cups cups cake flour
¾ tsp. baking powder
¼ tsp. baking soda
½ tsp. salt
1 stick unsalted butter, at room temperature
1 cup sugar
1/3 cup brown sugar
2/3 cup creamy peanut butter
3 large eggs
½ cup sour cream (reduced fat is fine)
1 tsp. vanilla extract
¼ cup buttermilk

Grape or strawberry jelly for filling
Chopped peanuts (optional)

Peanut Butter Frosting
2 sticks unsalted butter, at room temperature
2/3 cup creamy peanut butter
3 cups confectioners’ sugar, sifted
Pinch of coarse salt
1½ tsp. vanilla extract
2 tbsp. heavy cream

1. Preheat the oven to 350˚ F.  Line cupcake pans with paper liners.  Combine the flour, baking powder, baking soda, and salt in a medium bowl and whisk to blend.

2. In the bowl of an electric mixer, combine the butter and sugar and beat on medium-high speed until light and fluffy.  Blend in the peanut butter.  Beat in the eggs one at a time, blending well after each addition and scraping down the sides of the bowl as needed.  Blend in the sour cream.

3. With the mixer on low speed, mix in half of the dry ingredients, mixing just until incorporated.  Mix in the buttermilk and then the remaining dry ingredients, mixing each addition just until combined.

4. Divide the batter between the prepared liners filling each about 2/3 full.  Bake 18-20 minutes or until a toothpick inserted in the center comes out clean, rotating the pans halfway through baking.  Let cool in the pans a few minutes, then transfer to a wire rack to cool completely before proceeding.

5. Using a small paring knife to cut a small cone from the top of each cupcake.  Cut the tip portion off of each cone and discard, reserving a disc from each to cover the filling.  Fill each cupcake with a small spoonful of grape or strawberry jam.  Replace the cake discs over the filling.

6. For the frosting, combine the butter and peanut butter in the bowl of an electric mixer. Beat on medium-high speed until smooth. Mix in the confectioners’ sugar and salt. With the mixer on low speed, mix in the vanilla and cream just until incorporated. Increase the mixer speed to medium-high and whip until light and very fluffy, about 4 minutes. Frost and decorate as desired.