Monday, June 13, 2011

Martha Monday: Strawberry-Lemonade Icebox Pie

Even though summer won't officially be here for another week, it's been hotter than hot recently here in DC and that calls for chilled desserts that don't require too much prep work in a hot kitchen--plus, what could be more summery than strawberry lemonade?  I came across this recipe in last month's Martha Stewart Living and knew it would be a perfect and not-too-sweet compliment to a sticky DC summer day.      
While this pie isn't strictly "icebox" and does require a little bit of baking to set the filling, the result is still an quick and easy cool summer dessert perfect for backyard BBQs.  You can cut down even more on bake time if you substitute a pre-made graham crust, which I often find to be easier for transport and clean up when you're bringing dessert for a party anyways.   

Strawberry-Lemonade Icebox Pie
Crust
9 to 10 graham crackers, broken into pieces
1/4 cup sugar
Coarse salt
5 tablespoons unsalted butter, melted

Filling
1 can (14 ounces) sweetened condensed milk
2/3 cup strained fresh lemon juice (from 4 lemons)
2 large egg yolks (reserve whites for meringue), plus 1 large egg, lightly beaten
Coarse salt

Topping
12 ounces strawberries, sliced (2 cups)
3/4 cup sugar
2 teaspoons fresh lemon juice
3 large egg whites, room temperature (2 reserved from filling)

1.  Preheat oven to 375 degrees. Make the crust: Coat a 9-inch pie plate with cooking spray. Pulse crackers in a food processor until finely ground; measure 1 1/3 cups, and discard excess. Pulse cracker crumbs, sugar, and 1/4 teaspoon salt in food processor to combine. Add butter, and pulse until mixture is moist and holds together when pressed between 2 fingers.

2.  Press crust evenly into bottom and up sides of pie plate using the bottom of a dry measuring cup. (Make sure the sides and rim of the crust are firmly pressed so they don't crumble when pie gets cut.) Freeze for 30 minutes.

3.  Bake crust until firm and turning darker around edges, 10 to 11 minutes. Remove from oven, and reduce oven temperature to 325 degrees.

4.  Meanwhile, make the filling: Whisk together condensed milk, lemon juice, egg yolks and egg, and 1/4 teaspoon salt.

5.  Pour filling into warm piecrust. Bake until center is set, 25 to 30 minutes. Transfer to a wire rack, and let cool to room temperature. Refrigerate for at least 3 hours.

6.  Make the topping: Sprinkle berries with 2 tablespoons sugar and the lemon juice. Let stand for 30 minutes.

7.  Meanwhile, heat egg whites and remaining 1/2 cup plus 2 tablespoons sugar in the heatproof bowl of a mixer set over a pan of simmering water until sugar dissolves and mixture is warm to the touch, 2 to 3 minutes. Transfer to mixer, and whisk on high speed until medium peaks form, 8 to 9 minutes.

8.  Spoon berries over pie. Spoon meringue over top. Place pie under broiler, with rack in lowest position, until meringue is just browned. Alternatively, use a kitchen torch to brown the top.

Friday, June 3, 2011

Just Cupcakes

Because sometimes all you need is just a cupcake.

During a recent trip down to Virginia Beach from Washington, DC I hadn't really planned on trying to scope out any local cupcake shops.  Then again, I also hadn't really planned on getting caught in a massive thunderstorm which knocked out all power to the local area for about 12 hours.  By the time I got to my hotel, I'd survived at least a 10-mile stretch of road with no working traffic lights in which people had lost all sense of decorum and were driving as if the rapture had occurred and the zombies were, in fact, on their way. 

Needless to say, after spending the night in a hotel with no power, no hot water and no food (with nothing comped) I was feeling a little zombie-like myself.  Dirty, grumpy and hungry I trudged out of the hotel towards the parking garage and may have actually stopped in my tracks, so surprised was I to come face to face with a completely unexpected cupcake shop right across the street!


*Insert Angels Singing Here*
 Obviously this was a sign from the Cupcake Gods and I couldn't wait to stop in and sample a much-needed cupcake...or four.  Just Cupcakes has a rotating daily menu and I selected the Frankly Scarlett, Key Lime, Seriously Strawberry and Triple Chocolate.  In addition to an adorably hip, two-level shop and mini art gallery, the cupcakes were awesome! I loved the vast flavor selection, and all the cakes I sampled were moist, with consistently smooth buttercreams.  I particularly loved the Frankly Scarlett (red velvet) because it had the traditional cream cheese frosting but wasn't too tangy, and also actually tasted like chocolate, which is often missing in many reds.  Surprisingly I also really loved the Key Lime--even though I'm not usually a huge citrus fan, I found myself going back for bite after bite.

So next time you're in Virginia Beach--or next time you're in a crappy mood because you'd have been better off sleeping in your car than in your blacked out hotel--keep your chin up and there might be a Just Cupcakes, just where you need it.

If you go:
Just Cupcakes
261 Town Center Drive
Virginia Beach, Virginia 23462

Just Cupcakes
616 Hilltop West
Virginia Beach, Virginia 23451

Tuesday, May 24, 2011

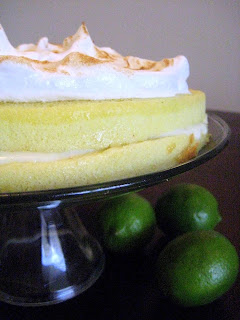
Key Lime Meringue Cake Strips

A couple of months ago, while perusing the aisles of Michael's craft store for Cherry Blossom Dinner 2011 supplies, I knew there was no way I was going to be able to avoid the baking supplies section.  Though I do find it a little odd that a craft store sells food dyes, ready-made fondant and all manner of cartoon character-shaped cake pans, I'm not complaining.  This time I managed to behave myself and only walked out with one trinket that had piqued my interest on my past couple of visits--the cake strip. 

Never heard of cake strips?  These seemingly humble strips of cloth claim to offer a one-stop-shop of baking perfection: Deliciously moist cakes! Even cooking temperature throughout! Perfectly flat, smooth cakes every time! By soaking the cake strips in water and attaching them to the outside of your cake pans before baking, the cooler pan edges supposedly avoid the domed top and overcooked sides that often plague my cakes.  Technically, you can make cake strips yourself just by cutting up old dish towels, but I thought I should try out the real thing for my first attempt before going Full Martha and making my own.

So, do they work?  First, a note: when trying out a new cake recipe, first make sure that it isn't missing any key ingredients like, oh, say LEAVENERS.  Secondly, don't proceed to look at your two pans full of essentially flour and egg whites then put them in the oven with a shrug, fully knowing that this is probably not going to turn out well.  Witness: the resulting ultimate cake fail, aka key lime crepes.
Luckily I had enough ingredients for a new recipe attempt and the resulting Key Lime Meringue Cake was awesome.  While the cake baked at a slant, rather than perfectly flat, it did avoid the typical domed top and was extremely moist and spongy with evenly-cooked edges.  I'm not sure the $8.99 price tag for two strips was really worth it, but I'll have to bake a few more cakes before my final verdict. 

Key Lime Meringue Cake
     adapted from Eating Well
1/3 cup low-fat milk
3/4 cup plus 2 tablespoons unsifted cake flour
1 teaspoon baking powder
1/4 teaspoon freshly grated nutmeg
2 large eggs, at room temperature
2 large egg whites, at room temperature
1 cup sugar
2 teaspoons fresh or bottled Key lime juice
2 teaspoons vanilla extract

Lime filling
1 14-ounce can nonfat sweetened condensed milk
1/3 cup lime juice, preferably Key lime
1 teaspoon freshly grated lime zest, preferably Key lime

Meringue
2 large egg whites, at room temperature, or equivalent dried egg whites, reconstituted according to package directions
1/4 cup sugar

1. Preheat oven to 350°F. Coat a 9-inch round cake pan with cooking spray with flour; alternatively, coat the pan with regular cooking spray, line them with parchment paper and spray the paper.

2. Heat milk in a small pan until steaming; remove from the heat, cover and set aside. Sift flour, baking powder and nutmeg into a bowl; set aside.

3. Beat 2 eggs and 2 egg whites in a mixing bowl with an electric mixer on low speed until frothy. Add 1 cup sugar and beat on medium speed until the eggs are very fluffy and pale, a full 3 1/2 minutes. Add 2 teaspoons lime juice, vanilla and the reserved dry ingredients. Beat on low speed just until the flour is incorporated. Beat in the hot milk (the batter will be thin).

4. Pour the batter into the prepared pan. Bake until the top feels firm when touched lightly and a skewer inserted in the center of the cake comes out clean, 23 to 25 minutes. Let the cake cool in the pan for 5 minutes. Run a knife around the inside of the pan to loosen the edges. Turn the cake out of the pan and set it right-side up on a wire rack to cool completely.  When cooled, use a long serrated knife to slice the cake horizontally into two layers.

5. To prepare lime filling: Whisk condensed milk, lime juice and 1 teaspoon lime zest in a medium bowl until combined. Refrigerate until thickened, at least 30 minutes or overnight.

6. To prepare meringue: Beat egg whites in a medium bowl with an electric mixer at high speed until soft peaks form. Beat in 1/4 cup sugar in a slow, steady stream. Continue beating until stiff peaks form.

7. Position oven rack about 6 inches from the heat source; preheat broiler. Transfer one layer, bottom-side down, to a large baking sheet. Spread the meringue on top of the cake, creating decorative peaks and valleys in the meringue with a rubber spatula. Broil until lightly browned, watching carefully to prevent burning, 30 seconds to 1 minute.

8.To assemble cake: Place the plain layer, top-side down, on a serving plate; spread the lime filling on top. Cover with the meringue-topped layer.

Sunday, May 8, 2011

Pink Grapefruit Vanilla Bean Gold Cup-cakes

I can't believe it's already that time of year again.  The time when we dust off the floppy sun hats, break out the seersucker, pop those collars extra high and lay on a healthy dose of bourbon-induced southern drawl to cavort along Great Meadows' north rail--that's right, it's Gold Cup.

Virginia's answer to the Kentucky Derby, Gold Cup is an event worthy of all your royal wedding-inspired hats and fascinators that has been run in The Plains, Virginia since 1922.  Ostensibly a steeplechase (and, perhaps more enticing, a terrier race), Gold Cup is an excuse to get dolled up in your finest frippery, sip bourbon like it's going out of style, cheer on the horses like the true equestrian Mumsie and Daddy raised you to be and refer to everyone as "Jeeves," "Muffy" or "Belvedere" while waiting in line at the port-a-johns.

Two years ago I tried to embody the true spirit of the races with Mint Julep and Iced Tea Cupcakes, but this year I decided copious amounts of mimosas would probably provide ample booze without infusing it into the cupcakes as well.  This year I decided to go with one of my all-time favorite flavors--grapefruit--to echo the sentiment of spring on what I hoped would be a sunny day.  Because the sweet zing of grapefruit can be difficult to capture, I decided to add a grapefruit curd filling as well, which almost didn't make it into the cupcakes because I wanted to eat it by the spoonful.
CURD!!!
Possibly my favorite thing about these cupcakes was getting to try out my adorable new Parisian-themed cupcake liners--because in my book Paris makes everything better :)

A couple of notes:
I was really intimidated by the idea of homemade grapefruit curd until I realized how simple it is! But to save time you can buy jarred citrus curds at most supermarkets.

I decided to go with a buttercream for these cupcakes, though a cream cheese frosting may have been better in retrospect. 

Pink Grapefruit Cupcakes
     from Ryan's Baking Blog makes 12
2 cups all-purpose flour
1 tablespoon baking powder
1/4 teaspoon salt
3/4 cup granulated sugar
1 tablespoon grapefruit zest (about 1 grapefruit)
2 eggs
1 cup plain whole milk yogurt
1/3 cup vegetable oil
1 tablespoon grapefruit juice
1 teaspoon vanilla extract

1. Preheat oven to 350°F and line a cupcake tin with paper liners.

2. In a medium bowl, sift and whisk together flour, baking powder, and salt.

3. In a large bowl, combine granulated sugar and grapefruit zest. Mix together with your fingers or the back of the spoon until the two are completely combined, creating a fragrant grapefruit sugar.

4. Beat the eggs into the sugar until the eggs are thick and pale yellow. Add the yogurt, oil, grapefruit juice, and vanilla extract. Stir well to combine. Add the flour mixture a little at a time, being careful not to overmix, until it is all incorporated.

5. Scoop batter into the paper liners, filling each about 3/4 full. Bake for about 18-20 minutes or until a toothpick inserted in the center comes out clean. Allow to cool in pan for a couple minutes before moving to a wire rack to cool completely.

Grapefruit Curd
     from Honey & Jam
8 large eggs yolks
1/2 cup freshly squeezed ruby red grapefruit juice
1/2 cup plus 2 tablespoons freshly squeezed lemon juice
finely grated zest of 1 ruby red grapefruit
1 cup sugar
1/8 teaspoon salt
1 1/4 sticks unsalted butter, cold, cut into pieces
1. Combine yolks, grapefruit juice, lemon juice, half of the zest, and the sugar in a saucepan; whisk to combine.

2. Cook over medium-high heat, stirring constantly with a wooden spoon (be sure to scrape the sides of the pan), until the mixture is thick enough to coat the back of the spoon, 8 to 10 minutes.

3. Remove saucepan from heat. Add salt and butter, one piece at a time, stirring until smooth.

4. Strain through a fine sieve unto a medium bowl. Stir in the remaining zest. Cover with plastic wrap, pressing it directly onto the surface of the curd to prevent a skin from forming. Refrigerate until chilled and set.

Grapefruit Vanilla Bean Buttercream
2 sticks unsalted butter, softened
Seeds of 1 vanilla bean (or extract)
1/4 cup grapefruit juice
4-5 cups powdered sugar
2 drops red food coloring, if desired

1. Cream butter until pale and fluffy.
2. Add vanilla, grapefruit juice and food coloring, mix until combined.
3. Add powdered sugar 1 cup at a time until reaching desired consistency.  Pipe onto cupcakes as desired.

Wednesday, April 27, 2011

Oh, Gurrrl--Cupcake Vodka

And here you were, getting all excited about the approach of summer so you could while it away on trendy patios everywhere, seeing and being seen, with a glass of Firefly Iced Tea Vodka swirling in your glass...Well, I'm here to tell you that those other flavored vodkas are SO 2010--because cupcake vodka has arrived.

That's right--the moment you didn't even know you were waiting for is here.  Somewhere at the corner of Gluttony Street and Sloshed Avenue is the intersection of guilty pleasures, captured in one bottle.      

From the same people that bring you Cupcake Vineyards--wines that, while delicious and the fastest-growing brand in 2010, don't taste like cupcakes--Cupcake Vodka is now hitting the streets in full-flavored cupcake fashion with Chiffon, Frosting, Devil's Food and Original flavors.  A grain and grape, six-times-distilled, 70-80 proof vodka with the "velvet silkiness, distinctive texture and a smooth finish" that you look for in vodka (and cupcakes...) cupcake vodka fills a niche in the flavored vodka market without using any artificial ingredients or sweeteners.

So what do you think? Is this a great idea, or just one more sign that cupcakes have jumped the shark?  Is this the chance manly men everywhere have been waiting for to indulge in their cupcake cravings without the fear of being seen with frou-frou frosting? Merely the latest incarnation of a cupcake trend that will one day consume the globe? :)  For me, the verdict is still out, but with cocktail creations like these, I know they won't keep me away for long...

Apple Crumb Cupcake
1.5 oz Cupcake Vodka Original
1.5 oz Apple Cider
One Very Small Piece of Fresh Skinned Ginger
1.5 oz Ginger Ale Lime Wedge & Green Apple Slice
Preparation
Muddle the ginger and Cupcake Original vodka in a mixing glass. Add the cider and shake with ice; strain over ice into a rocks glass and top with ginger ale. Garnish with a squeeze from the lime wedge and a green apple slice.

Friday, April 22, 2011

Cherry-Almond Crème Brûlée

After the rousing success of last month's inaugural Mardi Gras-themed supper club, it was recently my turn to host our rotating dinner just in time to coincide with DC's annual Cherry Blossom Festival, and we welcomed April with a cherry and Japanese-themed dinner inspired by DC's ubiquitous spring flower.

In addition to providing the main course of prosciutto-wrapped pork loin with cherry glaze, I obviously couldn't help but jump in with some cherry blossom-inspired desserts as well.  I decided on cherry-almond crème brûlée and--inspired by the cherry blossom festival menu at my fave DC restaurant Adour--cherry macarons.  Big mistake.

Because macarons are the cookie with possibly the most finicky reputation on the planet, I don't know what made me think I could crank some out like it was no big thing. "Oh, cherry macarons? The cookie to which you could devote an entire career of culinary study? No prob!" Suffice it to say that my macarons played along until the moment of no return, when they decided, at the last minute, to come out flat and crinkly.  While any number of things could have gone wrong (under beating the eggs, over beating the batter) I'm convinced that it's the cruel sting of baking karma.  As you may remember, Parisian Spring and I recently attempted our first batch of macarons and they came out PERFECTLY.  Like, omg-these-look-just-like-a-picture perfect.  So, because the baking gods blessed me the first time around, I know they're somewhere laughing with schadenfreude at my total macaron fail.

 
Macaron batter pretending to cooperate   


But on to the crème brûlée.

Fortunately, the crème brûlée came out excellently despite a little recipe mishmash and I was really pleased with the natural cherry flavor that comes from the addition of the cherry juice.  I think you could choose to leave the whole cherries in or out for this dish, depending on your preference.  Alternately I thought about puréeing the cherries first, so let me know if you try out that technique and how you like it.  Obviously the best part of crème brûlée is frightening your friends by wielding a kitchen torch after a few glasses of wine but, if you don't have one, you can always just pop your ramekins under the broiler of a few seconds to achieve the perfect sugar crust.

In honor of the Japanese gift of cherry blossoms, there was much hibachi to be had

I think Sandra Lee would be proud of my tablescape
Cherry-Almond Crème Brûlée
1 can sweet dark cherries, drained with syrup reserved
2 cups heavy cream
1/2 cup granulated sugar
2 teaspoons almond extract
5 large egg yolks
4 tablespoons sugar, for brulée topping

1.  Preheat oven to 325°F. Place six ramekins in a large roasting pan and arrange 5 cherries in the bottom of each.

2.  In a saucepan over medium heat, combine cream, 3/4 cup reserved cherry syrup, 1/2 cup sugar and almond extract. Stir until sugar dissolves, then bring to a simmer. Simmer gently for 10 minutes, stirring occasionally. Remove from heat.

3.  In a mixing bowl, whisk egg yolks until well blended. Gradually add hot cream mixture and whisk to combine.

4.  Divide custard among ramekins. Pour hot water into the roasting pan until it’s halfway up the sides of the ramekins. Carefully transfer pan to oven.

5.  Bake 35 minutes or until almost set (the center of each custard should wiggle when gently shaken). Using a large slotted spoon or tongs, carefully lift custards out of the water. Cool 30 minutes, then refrigerate for at least 3 hours and up to 2 days.

6.  When ready to serve, sprinkle 2 teaspoons of  sugar over each custard, turning and tapping the ramekin to evenly coat. Using a small kitchen torch, carefully move the flame across each until the sugar melts and browns, about 2 minutes. Refrigerate for at least 10 minutes and up to 2 hours, then serve.

Wednesday, April 6, 2011

Blackberry-Lemon Pie

I think my recent trip to the Dangerously Delicious pie truck may have subliminally influenced me more than I realized, because I was definitely craving pie last week.  And even though "easy as pie" may be one of those overused clichés, this seriously has to be one of the easiest pies I've ever made.  And, more importantly, it is by far the best pie I've ever made...if I do say so myself : ) I can't take too much credit though, because it was mostly due to the secret ingredient...

Blackberry is always my go-to pie because, well, it's my favorite.  But it's also an easy option because the fruit doesn't really take much prep work before going straight into the pie.  I know blackberries aren't exactly in season right now, but rhubarb is really the only pie-worthy ingredient in season right now, and I have to confess that I'm not a fan (don't hate me because I'm anti-rhubarb).  Anyways, I know a lot of us are often too busy to even cook dinner after work, let alone bake, but just pair a few pints of blackberries with a couple of refrigerated or frozen pre-made crusts and you've got a recipe for a super quick and delicious homecooked pie on a weeknight.

As for that secret ingredient...this was my first time using quick-cook tapioca in a pie.  I know, I know, it's nothing revolutionary, but I've never used anything other than flour or cornstarch to thicken a pie and this made all the difference.  The tapioca helps the fruit juices to congeal, forming a pie with more structure and, thus, seemingly more satisfying slices.  That being said, be careful not to go overboard on the tapioca, you don't want to end up with Jell-o pie. Or maybe you do, but that's up to you.

Blackberry Lemon Pie
2 store bought crusts, or your favorite recipe
4 cups blackberries
3/4 cup sugar
1 tsp cinnamon
1 tsp almond extract
1 Tbs lemon zest
1 Tbs lemon juice
1/4 cup Quick-cook Tapioca

1.  Preheat oven to 400 degrees.  In a large bowl, toss berries with sugar, cinnamon, almond extract, lemon juice, zest and tapioca in a large bowl and set aside for 15 minutes.

2.  Line a 9-inch pie plate with one of the pie crusts and fill with fruit mixture.  Cover with the remaining pie crust, flute and crimp edges to seal, and cut slits in top crust for steam to escape. If desired, place pie plate on a baking sheet to catch any juices that may overflow.

3.  Bake for 45-50 minutes or until browned and juices for bubbles that burst slowly.