Monday, December 24, 2012

The Boys of Baking Volume IV: New Orleans Pralines

Hey everyone! In our latest edition of the Boys of Baking, Ryan joins his Grandmother and Aunt in New Orleans, Louisiana for some traditional holiday candy making.

Today's guest blog will trace the steps of making traditional New Orleans Pralines. Pralines are thought to have been a creation of a personal chef of 17th century French statesman César duc de Choiseul Comte du Plessis-Praslin. Some believe Plessis-Praslin would have the candies made for women he was courting. According to the story, he would put the sweets into individuals wrappings with his name "Praslin" on them and people eventually began to simply refer to the candies as Praslin's (Pralines). The original receipt used almonds, but when French settlers came to New Orleans, local Creole chefs began to substitute the almonds with the plentiful pecans that grew in southern Louisiana. Today's recipe is for Creole Pralines from a local New Orleans family.

New Orleans Pralines
1 cup sugar
1cup dark brown sugar
2 tablespoons of light Karo syrup
1/2 cup whipping cream
2 tablespoons of butter
1 teaspoon of vanilla extract
1 cup of pecans

1) Place the white sugar, brown sugar, Karo syrup, and heavy whipping cream in a sauce pan.
2) Dissolve the sugars, Karo syrup and heavy whipping cream over medium heat until it boils.
3) Continue cooking until candy thermometer registers to 228 Fahrenheit - stirring occasionally.
4) Once the temperature reaches 228 Fahrenheit, add the butter, vanilla extract and pecans.
5) Continue cooking over medium heat until it reaches 236 Fahrenheit.
6) Remove from heat
7) Cool to 225 Fahrenheit
8) Beat until sauce thickens - happens very quickly
9) VERY QUICKLY, drop candy on wax paper into 10 or 15 individual portions
11) Let cool
10) Sit back under your closest Magnolia tree with a cup of chicory coffee and a plate of your delicious Creole pralines and enjoy!

Monday, December 3, 2012

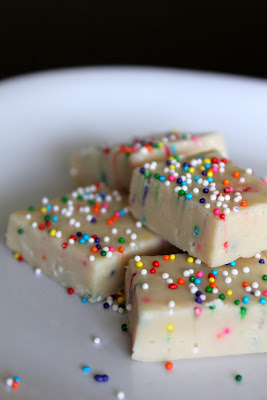
Funfetti Cake Batter Fudge Fail

I think I have a fudge curse. I haven't tried to make fudge in awhile because my last attempt saw me slaving away over the stove, sweaty and stiff-armed from stirring a pumpkin fudge that absolutely, resolutely refused to reach soft-ball stage. For anyone that's counting, that's 235-245 degrees on a candy thermometer.

When I came across this cute recipe recently, I thought it might be an easy way to ease back into fudge since it required NO stovetop time, and only microwaving. Easy as it sounds however, I guess this recipe didn't realize that I'm cursed. Despite microwaving the sweetened condensed milk and white chocolate chips for at least 4 minutes, these chips Would. Not. Melt. I ended up smashing most of them with the back of a spoon to get as close to a smooth consistency as possible.

Next, this recipe calls for three teaspoons of vanilla. 3. Not as much of a big deal if you're using grocery store, imitation vanilla. But if you're someone that likes to use the good stuff, this could get expensive. My problem wasn't cost so much as the fact that I only had brown vanilla extract, rather than clear. So, instead of having a nice, white cake look I had more of a beige/ecru/off-white cake look.

Finally, despite the picture I saw along with the recipe, the final product only makes a rather thin layer of fudge so, if you're looking for thick slabs of country-style fudge, you'll want to double the recipe. Oh, and in the end, it only sort of tasted like cake batter.


I always wonder whether to post recipe failures or not, but I figure it helps to show that not all the food you see online comes out perfectly the first time, and not all of us have the time, money and resources to continually throw out and remake recipes until they're just the way we'd like them. Or maybe I'm just cursed.

Funfetti Cake Batter Fudge
     from Pursuit Of Hippiness
1 14 ounce can sweetened condensed milk
3.5 cups white chocolate chips
3 tsp Vanilla Extract
1/2 tsp Almond Extract
Rainbow Sprinkles

1. Pour milk and white chocolate into a microwave-safe bowl. Heat for 2-3 minutes, or until white chocolate is almost completely melted. DO NOT OVERHEAT. Stir until completely blended, melted, and smooth.

2. Immediately add vanilla and almond and combine thoroughly. Add a handful or so of rainbow sprinkles and fold in quickly, because they will melt (and if they are stirred for too long they’ll turn the fudge an ugly muddy color).

3. Transfer to an aluminum-foil lined 8×8 inch baking pan for very thick fudge, or a 11X7 pan (recommended). Let set at room temperature or in the refrigerator.

4. Once set,  cut into cubes (and peel off the foil!). Store leftovers in an airtight container in a cool place.

Sunday, November 11, 2012

Cardamom Cranberry Pear Crisp

Hey everyone, please welcome back my mom for her latest and greatest guest blog post with this phenomenal fall dessert (and I'm not just saying that because of my feelings towards cardamom...)

If you love autumn but are tired of the pumpkin spice craze that erupts in October, cardamom Cranberry Pear Crisp may be the recipe for you. It was easy to make following the usual directions involved with making any fruit crisp.

I was totally unfamiliar with cardamom but since it's Hilary's favorite spice I knew I had to give this a try. First of all to paraphrase Hilary, "People, you really need to go to World Market for your spices." Cardamom at my grocery store ranged from $9 to $12 but was $3.99 at World Market.


I would call this an "Adults Only" dessert. What I mean by that is the cardamom gives this crisp a spicy flavor that smells amazing as it bakes and the tart cranberries keep it from being overly sweet. This is something I could serve at Thanksgiving to break up the monotony of the usual pumpkin and pecan pies.


It did surprise me in October that I had to go to 3 stores to find cranberries, finally having success at Whole Foods. I would recommend using firm pears. Two of mine were more ripe than the others and were on the mushy side when the crisp was done. Since I'm not a big fan of the peeling, coring and slicing involved, I was please to discover my apple corer worked equally well on the pears.


When I make this again I will add chopped pecans in the topping and have some vanilla ice cream handy!

Cardamom Cranberry Pear Crisp
     from The Columbus Dispatch

Topping:
1/2 cup butter (1 stick), at room temperature
1/2 cup packed brown sugar
3/4 cup flour
3/4 cup oats (old fashioned OR quick cook)
1/2 tsp cinnamon
1/4 tsp salt

Filling:
8 pears peeled, cored, and sliced
1 package (8 oz) fresh or frozen cranberries
1/2 cup packed brown sugar
1/2 tsp ground cardamom
1/4 tsp salt
2 Tbs cornstarch

1. Heat oven to 400 degrees. Coat a 9x9" baking dish with nonstick spray. To make the topping, in a medium bowl use an electric mixer to beat together the butter and brown sugar until creamy. Add the flour, oats, cinnamon and salt. Stir together until the mixture just form moistened crumbs and small clumps.

2. To make the filling, in a large bowl toss together the pears, cranberries, brown sugar, cardamom, salt and cornstarch. spread filling evenly in the prepared pan. Sprinkle to topping evenly over the filling. Bake for about 1 hour, or until the pears are tender and bubbling and the topping is well-browned.

Monday, October 29, 2012

Rootbeer Float Cake

My mother frequently laments that I never bake anything whenever I come home to visit. Because my brother is a rootbeer fanatic and veritable expert on all things root beer, I resolved to actually bake something on my last trip home and decided to try this Rootbeer Float Cake I'd seen on The Great Satan Pinterest as an homage to the end of summer.

For any of you who have attempted any recipes, sewing projects or, God forbid, DIY home improvements from Pinterest, you may be familiar with the infamous "Pinterest Fail" in which nothing ever comes out quite as pictured. Case in point, this will be the best chocolate bundt cake you've ever had. It will not taste like root beer.

Despite using rootbeer in both the frosting and the cake, there was unfortunately no discernable rootbeer flavor in the end product. However, this is BY FAR the moistest bundt cake I've ever had. Even after a couple of days the cake was still moist and fudgy, and I wouldn't hesitate to make this again to serve for any chocolate fiends. Similarly, the cake was awesome paired with a scoop of vanilla ice cream on the side, but just not what I was looking for.  If I made this again, I might try it with rootbeer extract instead to try to capture that summery flavor.


Alas, back to the Pinterest drawing board.


Rootbeer Float Cake
     from Brown Eyed Baker
2 cups root beer (do not use diet root beer)
1 cup dark unsweetened cocoa powder
½ cup (4 ounces) unsalted butter, cut into 1-inch pieces
1¼ cups granulated sugar
½ cup dark brown sugar
2 cups all-purpose flour
1¼ teaspoons baking soda
1 teaspoon salt
2 eggs

Rootbeer Fudge Frosting
2 ounces dark chocolate, melted and cooled slightly
½ cup (4 ounces) unsalted butter, softened
1 teaspoon salt
¼ cup root beer
2/3 cup dark unsweetened cocoa powder
2½ cups powdered sugar

1. Preheat oven to 325 degrees F*. Generously spray the inside of a 10-inch bundt pan with nonstick cooking spray, or butter the pan and dust with flour, shaking out the excess flour; set aside.

2. In a medium saucepan, heat the root beer, cocoa powder and butter over medium heat until the butter is melted. Add the sugars and whisk until dissolved. Remove from the heat and let cool.

3. In a medium bowl, whisk the flour, baking soda and salt together.

4. In a small bowl, whisk the eggs until just beaten, then whisk them into the cooled cocoa mixture until combined. Gently fold the flour mixture into the cocoa mixture. The batter will be slightly lumpy, which is okay. Do not overbeat it, as it could cause the cake to be tough.

5. Pour the batter into the prepared pan and bake for 35 to 40 minutes, rotating the pan halfway through the baking time, until a small sharp knife inserted into the cake comes out clean. Transfer the pan to a wire rack to cool completely. Gently loosen the sides of the cake from the pan and turn it out onto the rack.

6. To make the Root Beer Fudge Frosting, put all of the ingredients in a food processor. Pulse in short bursts until the frosting is shiny and satiny, scraping the sides of the food processor a couple of times. (If you don’t have a food processor, simply throw it all into the bowl of a stand mixer or a large bowl using a hand mixer and mix on medium-low until combined and satiny smooth.)

7. Use a spatula to spread the fudge frosting over the cake in a thick layer. Let the frosting set before serving. Store leftovers wrapped well or in an airtight container at room temperature.
*Note: If you are using a dark, nonstick pan, heat the oven to 300 degrees F.
 

Saturday, October 13, 2012

Oatmeal Cream Pies

If you're like me, you might think that there's no way that a homemade recipe could ever rival the taste of a true Little Debbie oatmeal cream pie.  Fortunately for both of us, we're both totally wrong.

When I first started seeing oatmeal cream pie recipes popping up across the interwebs, I was incredulous that anything I could make in my kitchen could achieve the moist, soft cookie or the signature filling flavor of the oatmeal cream pies of my childhood.

And, to be honest, the cookie is great but not exactly the same. But the filling...oh, the filling. It is amazing. It is perfect. It is Little Debbie without all the scary chemicals and preservatives. I did debate for awhile on which type of cookie recipe to use. Specifically, whether to go with one that would result in a puffy cookie that would make the sandwiches "look" better, or a flatter cookie that would better emulate the real deal. Clearly, you can see which I chose.

I used a Martha recipe for the cookies and, while it specifically calls for rolled oats rather than quick-cook oats, I only had quick-cook and all the other recipes I found called for this type as well. I didn't notice any issues, but can't say how they would have come out differently. Let me know if you try it!


The recipe also calls for using 2 Tablespoons of batter per cookie, which results in monster-size oatmeal cookies that are popular at bakeries these days (who eats that much cookie??) Anyway, I found 1 1/2 tablespoons to be much better and if you want 20-24 sandwiches, go ahead and reduce it to 1 Tablespoon.

A couple of notes: If you're smarter than me and already have a small cookie scoop, this would be the time to use it! Otherwise measuring out 1 1/2 Tablespoons of batter gets pretty messy.

Oatmeal Cookies
     slightly adapted from Martha Stewart 
     makes 13-18 sandwiches
1 1/2 cups all-purpose flour (spooned and leveled)
1/2 teaspoon coarse salt
1/2 teaspoon baking powder
1/4 teaspoon baking soda
1/4 teaspoon cinnamon
1 cup (2 sticks) unsalted butter, room temperature
3/4 cup packed dark-brown sugar
1/2 cup granulated sugar
1 tablespoon unsulfured molasses
1 teaspoon pure vanilla extract
2 large eggs
1 1/2 cups rolled or quick-cook oats

1. Preheat oven to 350 degrees. In a large bowl, whisk together flour, salt, baking powder, baking soda, and cinnamon. In another large bowl, using an electric mixer, beat butter, brown and granulated sugars, and molasses on high, scraping down bowl, until light and fluffy, 4 minutes. Add vanilla; beat until combined. Beat in eggs, one at a time, scraping down bowl after each addition.

2. With mixer on low, add flour mixture and beat just until combined. With a rubber spatula, stir in oats. Drop dough in 2-tablespoonful mounds, 2 inches apart, onto two baking sheets. Bake until cookies are just set at edges and slightly soft in middle, about 11 minutes, rotating sheets halfway through. Let cookies cool on sheets, 5 minutes. Transfer to wire racks and let cool completely.

Oatmeal Cream Pie Filling
     from Baked Perfection
2 teaspoons hot water
1/8 teaspoon salt
1 (7 ounce) jar marshmallow cream
1/2 cup vegetable shortening
1/3 cup powdered sugar
1 teaspoon vanilla extract
While the cookies bake prepare the filling. In small bowl, dissolve the salt in the hot water. Set aside and allow this to cool.  Combine marshmallow cream, shortening, powdered sugar, and vanilla in a bowl; mix on high until fluffy (3-4 minutes).  Add the cooled salt water and mix well.  Spread filling on flat side of one cookie, press 2nd cookie on top.

Monday, October 1, 2012

Martha Monday: Ginger Pumpkin Bread

Let the ubiquitous pumpkin recipes begin!! I have to confess that I'm a complete sucker for all things pumpkin. My favorite holiday is Halloween, and I can't get enough of the pumpkin spiced lattes, ice creams, pancakes, breads, pies and everything else that abound this time of year.

Like zucchini and banana breads, you might think that's there's not really much that can be done to revamp the traditional pumpkin bread. However, this might actually be my favorite pumpkin bread, and my new go-to recipe. I was somewhat surprised because, being a Martha recipe, it's actually surprisingly easy. For example, you don't need to peel, seed, and roast your own pumpkin. Who has time for that? Nope, this recipe just calls for scooping out pre-pureed pumpkin from a glorious can. Also, I love that this recipe isn't overly sweet. I'm used to pumpkin breads that essentially taste like pumpkin pie, but this loaf isn't overwhelmed with cinnamon, cloves, nutmeg and allspice--but only a slightly spicy hint of ginger that complements the pumpkin perfectly.


Ginger Pumpkin Bread
     from Martha Stewart
     makes 2 loaves

12 tablespoons (1 1/2 sticks) unsalted butter, melted, plus room-temperature butter for pan
2 1/2 cups all-purpose flour (spooned and leveled), plus more for pan
2 teaspoons baking powder
2 teaspoons ground ginger
1 teaspoon salt
1 cup granulated sugar
1 cup packed light-brown sugar
1 can (15 ounces) pumpkin puree (1 3/4 cups)
3 large eggs

1. Preheat oven to 375 degrees. Butter and flour two 8 1/2-by-4 1/2-inch (6-cup) loaf pans; set aside. In a large bowl, whisk together flour, baking powder, ginger, and salt. In a medium bowl, whisk together sugars, pumpkin, melted butter, and eggs; add flour mixture, and stir until just combined.

2. Divide batter between prepared pans. Bake until a toothpick inserted in center of loaves comes out clean, about 50 minutes. Let cool 10 minutes; invert pans and transfer loaves to a wire rack to cool completely. Glaze, if desired.

Sugar Glaze
1 1/2 cups confectioner's sugar

1. In a small bowl, mix confectioners' sugar with 2 to 3 tablespoons water until mixture is smooth but thick. Place waxed paper under rack for a quick cleanup. For easy pouring, transfer glaze to a liquid-measuring cup, and drizzle over loaves. Let dry 15 minutes before serving. Makes enough for 2 loaves.

Friday, September 21, 2012

Peanut Butter and Jelly Cupcakes, Cupcake Camp DC 2012

For other avid followers of the cupcake scene, you may already be familiar with Cupcake Camps. Originally designed as an informal gathering for cupcake lovers, the event has now gone global, spanning the US, Canada, Australia and Europe. Unfortunately, I was out of town for the first two iterations of Cupcake Camp DC, but this year I was finally able to throw my hat in the ring with my take on Peanut Butter and Jelly Cupcakes. With both amateur and professional categories, more than a dozen bakers contributed cupcakes for this year's event benefiting the DC Candlelighter's Foundation, and raising more than $2000 for the children's cancer foundation.

Despite a tornado warning and torrential downpour, lots of cupcake fans showed up to sample flavors like Lemon Lavender, Irish Cream, Spiced Caramel Apple, Cannoli, Spumoni and--the crowd favorite--Chicken and Waffles Cupcakes. After running a test batch of Peanut Butter Cupcakes past my coworkers, I decided to incorporate their suggestion of making both grape and strawberry-filled cakes, so that tasters could pick their favorite PB&J combo. Similarly, I topped a few with chopped peanuts for the chunky peanut butter devotees.


 Want to host a Cupcake Camp in your hometown? Check out the Cupcake Camp page for all the how-to details!

A couple of notes: If you decide to make these cupcakes--and I may be biased, but you totally should--you can also make these cupcakes using regular, all-purpose flour, just reduce the amount by 2 tablespoons (though the crumb texture won't be as soft). As for decorations, for the jelly drizzle I diluted some jelly with a tablespoon of water and used a plastic squeezy bottle. Just a bit of advice though--if you try to do this with strawberry jelly, you'll want to pass it through a mesh sieve first to remove the berry pieces. Trust me on this one.


Peanut Butter and Jelly Cupcakes
     adapted from Annie's Eats
     makes 18-22 cupcakes
2 cups cups cake flour
¾ tsp. baking powder
¼ tsp. baking soda
½ tsp. salt
1 stick unsalted butter, at room temperature
1 cup sugar
1/3 cup brown sugar
2/3 cup creamy peanut butter
3 large eggs
½ cup sour cream (reduced fat is fine)
1 tsp. vanilla extract
¼ cup buttermilk

Grape or strawberry jelly for filling
Chopped peanuts (optional)

Peanut Butter Frosting
2 sticks unsalted butter, at room temperature
2/3 cup creamy peanut butter
3 cups confectioners’ sugar, sifted
Pinch of coarse salt
1½ tsp. vanilla extract
2 tbsp. heavy cream

1. Preheat the oven to 350˚ F.  Line cupcake pans with paper liners.  Combine the flour, baking powder, baking soda, and salt in a medium bowl and whisk to blend.

2. In the bowl of an electric mixer, combine the butter and sugar and beat on medium-high speed until light and fluffy.  Blend in the peanut butter.  Beat in the eggs one at a time, blending well after each addition and scraping down the sides of the bowl as needed.  Blend in the sour cream.

3. With the mixer on low speed, mix in half of the dry ingredients, mixing just until incorporated.  Mix in the buttermilk and then the remaining dry ingredients, mixing each addition just until combined.

4. Divide the batter between the prepared liners filling each about 2/3 full.  Bake 18-20 minutes or until a toothpick inserted in the center comes out clean, rotating the pans halfway through baking.  Let cool in the pans a few minutes, then transfer to a wire rack to cool completely before proceeding.

5. Using a small paring knife to cut a small cone from the top of each cupcake.  Cut the tip portion off of each cone and discard, reserving a disc from each to cover the filling.  Fill each cupcake with a small spoonful of grape or strawberry jam.  Replace the cake discs over the filling.

6. For the frosting, combine the butter and peanut butter in the bowl of an electric mixer. Beat on medium-high speed until smooth. Mix in the confectioners’ sugar and salt. With the mixer on low speed, mix in the vanilla and cream just until incorporated. Increase the mixer speed to medium-high and whip until light and very fluffy, about 4 minutes. Frost and decorate as desired.

Wednesday, August 29, 2012

Sour Cherry Gelato

As a confessed ice cream addict, it's no surprise that I also made it my job to sample my fair share of gelatos (er, gelati) on my trip through Italy in 2010.  While being sure to sample a wide variety of flavors--from banana, to coconut, to fig and tiramisu--surprisingly, my favorite was sour cherry, er amerena.

I say surprisingly because I probably never would have knowingly chosen a scoop of sour cherry, and most likely did so as a result of my generally non-existent Italian tourist language skills. But luckily for me this turned out to be an awesome mistake, and not only is sour cherry delicious on its own, but was also the perfect complement to any other flavor I paired it with.

After the success of last month's Roasted Strawberry Buttermilk ice cream, I thought revisiting this Italian treat would be a great way to use the rest of the hand-picked sour cherries I'd actually had the forethought to freeze back in June. (score!)


I'm still a little skeptical that one can make gelato at home; although gelato is typically made with a higher milk-to-cream ration that ice cream, the other key difference is that it's churned at a lower speed, and thus has less air incorporated, giving it that dense and creamy texture you just don't get with ice cream. So, while this is pretty much impossible with a home ice cream machine, I'm still calling it gelato.

Buon Appetito!

Gelato Root Beer Float!
A couple of notes: In my Jeni's ice cream cookbook, I remembered her mentioning that using chopped pieces of fruit will often simply result in frozen chunks of fruit...unfortunately, I remembered this as I was chewing frozen pieces of cherry in my gelato. If you want to avoid this but still have some extra fruit flavor and color, you may want to puree the reserved cherries and mix them in after churning, rather than adding chopped pieces. Also, I'm usually super lazy when it comes to vanilla, but this is one recipe where using an actual vanilla bean rather than extract really adds a lot--and you know what I'm going to say here--Get them at World Market on the cheap!!

Sour Cherry Gelato
     from NPR

1 1/2 cups whole milk
1 1/2 cups heavy cream
1 whole vanilla bean, split
6 large egg yolks
3/4 cup superfine sugar
Pinch of salt
4 1/2 packed cups pitted sour cherries, also known as pie cherries, cut in half
1/2 cup granulated sugar

1. Place the milk and heavy cream into a large saucepan. Scrape the seeds from the vanilla bean into the pan and add the pod to the pan as well. Bring the milk and cream just to a boil but take care not to let the mixture boil over. Remove the pan from the heat.

2. In a medium-sized bowl, beat the egg yolks with the superfine sugar and salt until light and thick. Whisk a small ladleful of the hot milk and cream into the eggs, whisking quickly to prevent the eggs from curdling. Add 4 or 5 more ladlefuls of the milk mixture, one at a time, whisking all the while. Pour the egg-milk mixture into the saucepan with the remaining milk and cream, and whisk to combine thoroughly. Cook the custard on medium-low to medium heat, stirring constantly, for about 20 minutes or until it is thick enough to lightly coat the back of a wooden spoon. Do not let the custard boil. Remove from heat, and pour the custard into a heatproof bowl. Remove and discard the vanilla bean pod. Cover the custard with plastic wrap, making sure to press the wrap right onto the surface to prevent a skin from forming. Refrigerate until thoroughly chilled.

3. Place 3 cups of the cherries and the granulated sugar in a medium-sized saucepan. Bring the cherries to a simmer over medium heat and cook until the sugar has melted and the cherries are soft, 10 to 15 minutes. Pass the cooked cherries through a food mill fitted with the disk with the smallest holes. If you don't have a food mill, puree the cherries in a food processor or blender, then strain the puree through a fine-mesh sieve and discard the solids. You should have about 1 1/4 cups of liquid. Put the liquid in a small saucepan and bring it to a simmer over medium heat. Simmer gently for 10 to 15 minutes, until it is slightly thickened and reduced to about 1 cup. Remove the cherry syrup from the heat and let it cool to room temperature.

4. Stir the cherry syrup into the cold custard and refrigerate until the mixture is thoroughly chilled.

5. Freeze the cherry custard in an ice cream machine according to the manufacturer's instructions. When the ice cream is just about done, mix in the remaining 1 1/2 cups cherries. Transfer the ice cream to a tightly lidded container and freeze until hard.

Wednesday, August 15, 2012

Peach Streusel Muffins

Happy National Peach Month!! After a slice of delicious Brown Sugar Cinnamon Peach Pie, the peach parade continues with what turned out to be somewhat unfortunate peach muffins...

So, have you ever had that moment in the middle of cooking where you realize things are not exactly going the way you planned? For me, that moment happened with these biscuits err, muffins when I noticed that the dough was getting pretty thick. Really thick. And sticky. We're talking, like, pizza dough.

Then, rather than getting mixed by the mixer, the batter proceeded to actually CONSUME the beaters and become entirely wrapped around the mixer in a giant ball. It was awesome.


Having double and triple checked the recipe, I refuse to admit that this could possibly have been user error :)  Honestly, I think Betty Crocker was just a little off in their liquid measure for this recipe and next time I would definitely up the milk or maybe add oil or sour cream instead. To be fair these muffins were still tasty when warm, but just a little too dense and pancakey for my taste once they cooled.


 Peach Streusel Muffins
     from Southern Living 

1/4 cup butter or margarine, softened  
1/3 cup sugar 
1 large egg  
2 1/3 cups all-purpose flour 
1 tablespoon baking powder 
1/2 teaspoon salt 
3/4 cup milk  
1 teaspoon vanilla extract 
1 1/2 cups fresh or frozen peeled peaches, chopped 
1/4 cup sugar 
3 tablespoons all-purpose flour 
1/4 teaspoon ground cinnamon 
2 1/2 tablespoons chilled butter or margarine

1. Beat 1/2 cup butter at medium speed with an electric mixer until creamy; gradually add 1/3 cup sugar, beating until light and fluffy. Add egg, beating until blended.

2. Combine 2 1/3 cups flour, baking powder, and salt. Add flour mixture to butter mixture alternately with milk, stirring well after each addition. Stir in vanilla extract, and fold in chopped peaches.

3. Spoon muffin batter into greased or paper-lined muffin pan, filling two-thirds full.

4. Combine 1/4 cup sugar, 3 tablespoons flour, and cinnamon; cut in 2 1/2 tablespoons butter with pastry blender or fork until mixture resembles crumbs. Sprinkle evenly over muffin batter.

5. Bake at 375 degrees for 20 minutes or until golden. Remove from pan and cool on wire rack.

Wednesday, August 1, 2012

Brown Sugar Cinnamon Peach Pie


Recently, one of my absolute favorite food bloggers Smitten Kitchen posted about getting back to basics, and allowing simple flavors to shine through in dishes rather than fixing what isn't broken by throwing in heaps of extracts or spices just for the sake of it. Generally, I agree. Well, except for cardamom, you know how I feel about that. : )  In SK's post, she was specifically referring to peach pie, and while I absolutely agree that the delicious flavor of in-season fruit stands on its own, when I had a craving for peach pie a couple of weeks ago, I knew plain old peaches just weren't going to cut it.


I was craving a pie with depth. Specifically, a peach pie complemented by the sweet touch of brown sugar and cinnamon. And when I found a recipe that included both of these things AND a dash of booze, I knew it had to be good.

If you're worried about overwhelming sweetness (not usually something that enters my pie-eating considerations...) although this recipe calls for both white and brown sugars, surprisingly the most frequent compliment I received on this pie was that it wasn't too sweet. Similarly, even though the bourbon smelled a bit overwhelming in the initial stages, the flavors melded beautifully and it didn't stand out at all in the end.


A couple of notes: Using peaches that are a little more on the firm side is fine, this helps to keep their shape during baking rather than getting too mushy. I also, accidentally, reduced the brown sugar in this recipe to 1/3 cup but will probably continue to do so based on the feedback. I went with my new go-to crust recipe from The Homemade Pantry, but feel free to use your own favorite or store bought crust.

Brown Sugar Cinnamon Peach Pie
     from Pink Parsley
6-8 large fresh, firm, ripe peaches (3-4 lbs)
1/4 cup flour
1/2 cup firmly packed brown sugar
1/3 cup granulated sugar
1 1/2 tsp ground cinnamon
1/8 tsp salt
2 Tbs bourbon or whiskey
2 Tbs butter, cut into small pieces
1 large egg, lightly beaten + 1 tsp water
1 1/2 Tbs granulated sugar + 1/2 tsp cinnamon

1. Divide your chosen pie crust dough into 2 equal pieces and on a lightly floured surface, roll the first piece into a 12-inch circle.  Starting at 1 side of the dough, wrap it around a rolling pin and transfer to a 9-inch pie plate.  Press dough into the plate being careful not to punch through.  Trim the overhang.

2. Peel the peaches, and cut into 1/2-inch thick slices, and cut the slices in half.  In a large mixing bowl, whisk together the flour, sugars, cinnamon, and salt.  Add the peaches and bourbon, and stir to coat.  Immediately pour the filling into the pie plate, and scatter the butter pieces over the top.  Don't make the filling until you are ready to use it, because the peaches will give off too much of their liquid and the filling will be runny.

3. Roll the second pie crust into a 10-inch circle, and if making a lattice crust, cut into several strips using a pizza cutter or knife.  Make a lattice design over the peaches.  If you choose to make a standard top, transfer the crust to the pie, pinch the edges together to make a fluted edge or use the tins of a fork to press them closed.  Cut a few slits in the top to release steam.

4. Brush the top with the egg wash, then sprinkle with the cinnamon-sugar.

5. Freeze the pie for 15 minutes.  Meanwhile, preheat the oven to 425 degrees, and position the oven rack to the lowest position.  Heat a baking sheet in the oven as it preheats.

6. Place the pie on the preheated baking sheet.  Bake 15 minutes, then reduce the oven temperature to 375 degrees.  Bake 40 minutes.  If the crust is getting too dark, cover loosely with aluminum foil.  Bake an additional 15-25 minutes, or until the juices are thick and bubbly.  Transfer to a wire rack to cool 2 hours before serving.

Monday, July 23, 2012

Vanilla Cardamom Quinoa Pudding

Just as I have become a reformed rice pudding hater, quinoa is another food that I've come around to slowly. It's seemingly exotic, can be somewhat bland and, let's be honest, I was one of those people still calling it "kin-oh-uh" until that Whole Foods Parking Lot viral rap.

But in a half-assed hearted attempt to improve some of my carb choices, I thought there must be a way to combine this super food with a little bit of the sweetness I still crave. As a high-quality protein with lots of fiber, iron, calcium, riboflavin, magnesium, yadda, yadda, yadda--basically all the good stuff you need that you never want to eat (if you're a cupcake fiend like me), quinoa is an awesome gluten-free replacement for rice in this light summer pudding.

I used almond milk because it's all I had on hand, but you could easily replace it with regular milk, or even substitute for the heavy cream to make this recipe completely dairy free, and vegan.

A couple of notes: Be sure to rinse your quinoa before using it. The seeds are actually coated with a chemical (saponin) that is usually washed off during processing but, just in case, you'll want to give it another rinse as it can interfere with the digestion of all the yummy healthful benefits mentioned above. In that case, you might as well just eat rice pudding :)


Vanilla Cardamom Quinoa Pudding
     adapted from Enlightened Cooking
1 cup quinoa, rinsed
3 cups almond milk
1/2 cup heavy cream
1/2 teaspoon cardamom
1/4 cup sugar
1/8 teaspoon salt
2 teaspoons vanilla
1/2 teaspoon rosewater (optional)
Chopped pistachios for garnish (optional)

1. In a medium saucepan, combine quinoa, sugar, cardamom, salt, milk and cream. Bring to a gentle boil over medium heat. Reduce heat to medium-low, cover leaving lid ajar, and simmer stirring occasionally for 30-35 minutes, or until quinoa is very soft and mixture is thickened.

2. Remove from heat and stir in vanilla and rosewater (if using). Transfer to a heatproof bowl and let cool to room temperature. Serve cool or chilled topped with chopped pistachios if desired. Serves 4-6.

Friday, July 13, 2012

La Pâtisserie des Rêves, Paris


I'm not really sure why I never visited La Pâtisserie des Rêves before on a trip to Paris, other than it's possible that I was so intimidated by its sheer amazingness that I felt more comfortable sticking to my usual canelés and pain au chocolat until I was truly ready to experience its awesomeness.

La Pâtisserie des Rêves, in fact, means "Pastry Shop of Dreams." Seriously. Creating inspired versions of classic French pastries, this shop is like no other you'll find in Paris. In addition to gorgeous craftsmanship, the shop itself is like something out of The Jetsons. The tiny shop is almost more like a showroom, with flashy colors, pastries raised by futuristic dumbwaiters, uber-modern takes on the classic sweets, and the most sophisticated packaging system I've ever seen to make sure your treats get home in one piece.

Somehow we managed to limit ourselves to 5 pastries (and one bag of marshmallows...) but I could have tried one of everything. Next time you can bet I'll be back for a Moka and a Paris-Brest (calm down, it's just a pastry).

Thinking this doesn't look like any St. Honoré you've seen before? You'd be right.
Fruitier du Saison. I thought the topping was marshmallow or meringue, but it turned out to be an impossibly thin shell of white chocolate!

Parisian marshmallows!! The inspiration for one of my 2012 baking resolutions
Opened by Philippe Conticini in 2009, the shop has received nothing but awards and rave reviews and definitely deserves to be on your bakery rotation if you happen to find yourself in the City of Light. The rue du Bac location I visited is carry-out only, but rumor has it the rue de Longchamp shop has a tea salon as well, presumably where everyone can see you (just something to keep in mind if you plan to devour 5+ pastries...)

If you go (and you MUST)
93 rue du Bac
Paris, 75007
Metro- rue du Bac (line 12)

111 rue de Longchamp
Paris, 75016
Metro- rue de la Pompe (line 9)

Friday, July 6, 2012

Sugar Plum Cake Shop, Paris


After what seemed like many months of excruciating waiting, last month I finally set sail for the latest trip to my favorite city in the entire world--Paris.  Along with plotting out the perfect stops for sightseeing, as you can imagine I spent at least as much time picking out which bakeries to hit on this week-long trip.

On past trips to the City of Lights, I've tried to seek out Parisian cupcakeries to see how the continental counterparts compare. Unfortunately, I've found them to be exclusively dense, dry, and hard. Not necessarily a surprise, since cupcakes are an American import and not exactly the forte of Parisian pastry chefs.

Not to fear, however, because on this trip I was able to wallow in what Paris does do best: macarons, tarts, pain au chocolat, St. Honorés, Opéras, canelés, and the list goes on, and on, and on, and...

If you have had your fill of Parisian pastry however and are looking for a little taste of home, Sugar Plum Cake Shop is a must see for American style drip coffee, drinks that actually come with ice in them, free wifi, and huge slabs of moist and flavorful layer cake.


After a long, hot day of walking through the streets of Paris (tough life, I know) The homemade lemonade and sweet tea on offer that day were a welcome sight.


Of course I couldn't help myself and had to try a red velvet cupcake. Also on offer were cookies and cream, peanut butter chocolate and pistachio, and if you're in town for awhile you can also place orders for all your favorite brownies, cookies, pies and cheesecake.


The international Red Velvet
If you go:
Sugar Plum Cake Shop
68 rue du Cardinal Lemoine
Paris 75005
Tuesday-Sunday 12pm-7pm
Metro: Cardinal Lemoine (Line 10), Place Monge (Line 7)

Saturday, June 23, 2012

Jeni's Roasted Strawberry Buttermilk Ice Cream


Though I may have brought home quite a haul of sour cherries from this month's berry picking expedition to Hollin Farm, the original purpose of the trip was a hunt for strawberries. A true harbinger of the arrival of summer, I couldn't wait to get my hands on some fresh, ripe berries for the plethora of strawberry recipes I'd been collecting.  Along with jams, galettes, compotes and breads, I knew for sure that Jeni's Roasted Strawberry Buttermilk Ice Cream had to be one of the first destinations for these babies.


If you remember, finally making ice cream has been one of my 2012 Baking Resolutions--after my ice cream maker had been languishing in the cabinet for two long years, I finally took the plunge inspired by the dozens of amazing flavors in the new Jeni's Splendid Ice Creams cookbook. By now you may have seen Jeni's featured on any number of morning and talk shows, not to mention places like Saveur and Dean&Delucca but growing up with it in Columbus, OH I had always taken it for granted. Now that I live in DC, the ability to whip up confections like Toasted Rice Ice Cream with a Whiff of Coconut and Black Tea at home whenever I want is just too tempting.


Despite a couple of missteps, I think my first ice cream attempt came out amazingly well! Rookie mistake #1 was not watching the custard base while it was cooking, letting the milk boil over and create a skin on the bottom of the pan. Rookie mistake #2 was not straining the mixture to remove the skin and assuming that it would get smoothed out during the mixing process. Wrong. So, let this be a warning to you, ye young ice cream maker.

If, like me, you also have an ice cream maker languishing in your cabinets and are thinking about liberating it this summer, I might also refer you to rookie mistake #3--not reading the manufacturer's instructions. Depending on the type of machine you have, it may require you to first freeze the mixing bowl for 16-24 hours in advance or, oh, I don't know, ADD 3 CUPS OF ROCK SALT AND 8 POUNDS OF ICE around the mixing bowl. So, yeah, there's that.

Roasted Strawberries!

All in all the ice cream making was ridiculously easy and now I just have the difficult decision of choosing what recipe to try out next!


Jeni's Roasted Strawberry Buttermilk Ice Cream
1 pint strawberries, hulled and sliced 1/2-inch thick
1/3 cup sugar
3 tbsp fresh lemon juice
1 1/2 cups whole milk
2 tbsp cornstarch
2 oz (4 tbsp) cream cheese, softened
1/8 tsp fine sea salt
1 1/4 cups heavy cream
2/3 cup sugar
2 tbsp light corn syrup
1/4 cup buttermilk

1. To roast the strawberries, preheat the oven to 375F. Mix the strawberries with the sugar and place in an 8-inch square glass or ceramic baking dish, stirring to combine. Roast for 8 minutes, just until soft. Allow to cool slightly.

2. In a food processor or a blender, puree the strawberries with the lemon juice. Measure 1/2 cup of the pureed mixture and refrigerate the rest for another use (I threw it in a smoothie).

3. To make the ice cream base, mix 2 tbsp of the milk with the cornstarch in a small bowl, mixing to make a smooth slurry. In a separate large bowl, whisk together the cream cheese and salt. Set aside.

4. Fill a large bowl with ice and water and set aside.

5. In a 4-quart saucepan, combine the remaining milk, the cream, sugar, and corn syrup, heating to a rolling boil over medium-high heat. Boil for 4 minutes. Remove from heat and gradually whisk in the cornstarch slurry. Return the mixture to a boil over medium-high heat, stirring with a heatproof spatula, cooking until slightly thickened (about 1 minute). Remove from heat.

6. Gradually whisk the hot milk mixture into the cream cheese, whisking until smooth. Stir in the 1/2 cup strawberry puree and buttermilk, mixing well. Pour the mixture into a gallon Ziploc freezer bag and submerge the sealed bag into the ice water. Allow to stand for about 30 minutes, until chilled.

7. Churn ice cream according to ice cream maker instructions. Pack the ice cream into an airtight storage container and freeze until firm, at least 4 hours.