Saturday, October 31, 2009

Happy Bake-o'ween!

I can't really explain why Halloween is my favorite holiday. Sure, candy is great, but I can't really go trick-or-treating anymore. Dressing up in costumes is also always fun, although I'm continually upstaged by girls dressed as Little-Miss-Butt-Cheeks-Hanging-Out. I guess any of the activities that we love about Halloween could take place at any other time of the year, but there's just something about the late fall conglomeration of all things spooky that makes October 31st something special.

Since I unfortunately don't have any real plans for this year's festivities I decided to go all out on the sweets instead and, with a little help from the Wilton online decorating shop, I made some killer stenciled sugar cookies as well as some ghoulish Fingers of Fate candied pretzel rods. This was my first foray into using both stencils and candy molds and, I have to say, I'm pretty proud of them for a first attempt.

The Wilton online shop really has a wealth of beginner decorating tools and ideas for cakes, cookies and candy for all holidays and celebrations and, browsing the site a couple of months ago, I happened to come across these stencils and had to have them. I was also intrigued by the colorful candy witch finger candy molds but was nervous; I've never made candy before. I also bought black and green candy melts to make the fingers as well as black decorating sugar for the cookies and everything including shipping still cost less than $20. In the end, both were super simple and just required a little bit of patience and a delicate touch. If you are in any way artistic to begin with, these will be a cinch for you.
For the cookies, I bought a packaged sugar cookie mix and used an easy royal icing recipe, this time substituting powdered egg whites for the real thing. Separate your batch of icing into bowls depending on how many colors you plan to use while the cookies are baking, as royal icing dries very quickly and you'll want to have everything prepped. A couple of other notes, as soon as your cookies come out of the oven you may want to flatten them gently with the back of a spatula in order to have the flattest decorating surface possible. Also remember to make your cookies a little larger than usual to accommodate the background icing as well as the size of the stenciled design. Unfortunately I don't have a picture of it, but I just used a children's paint brush to lightly wet the inside of the stenciled design before sprinkling a healthy dose of sugar on top. After sprinkling, pat the design lightly with your fingertips, remove the stencil gently with both hands and--Voila!For the candy, using the microwaveable candy melts couldn't have been easier and I still have plenty left over. By using another children's paintbrush, it's easy to paint the interior of the fingernail first with the black candy (do this in thin layers allowing time to dry in between to slowly color in the entire fingernail portion). Once this is set, the green candy is used to fill in the mold. Just add a pretzel rod and refrigerate until set. Boo!

Monday, October 26, 2009

Gimme More (Chi-town Cupcakes, Pt. II)

Ok, I'll admit it. I was jealous. After reading Tanya's guest post about all the fabulous cupcakes she got to try during her stay in Chicago, I knew there had to be more that I could sample during my own trip to the windy city last weekend. And after some quick research I certainly found more--More Cupcakery, in Chicago's posh Gold Coast neighborhood. A tiny shop nestled in between stately buildings near the famous Magnificent Mile, this cupcakery is the perfect stop after a full day of (window) shopping at places like Tiffany's, Nordstrom's, Gucci and Louis Vuitton. Or, in my case, the Hershey store.

I have to admit, though, this is the cupcake review that almost wasn't. From the time I landed at Chicago's O'Hare airport it rained. When I woke up the next morning it rained. On the third morning when I trekked out to the suburbs hoping to dodge the rain...it rained. But, finally, the clouds parted Saturday afternoon and it was gloriously sunny. Immediately I dashed out of the hotel, thrilled to be able to take my time finding More without landing ankle-deep in puddles and being poked in the eye by other tourists with umbrellas.

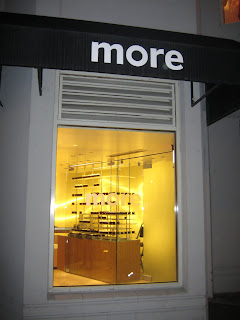
And yet, you will notice not only is the photo of More decidedly NOT sun-drenched, but it is in fact nighttime. I was a little...misdirected. Ok, so I walked in completely the wrong direction. BUT I got to the shop just before closing and still had plenty of designer cakes to choose from. I got seasonal selections pumpkin and apple spice, as well as classic red velvet, and wildcard s'more. The first thing I noticed about More's cupcakes was their height: baked in stiff, brown paper collars that form the cake up instead of out, these tall cakes have a very unique look that sets them apart, even if making it a little more difficult to take a bite. More's shop also has a unique look, displaying cupcakes in a clear, segmented case at eye level, as if they're floating in thin air.

As for flavor, I enjoyed parts of each cupcake individually but thought only the pumpkin was a stand-out winner. If you're a red velvet fan, while I thought the cake lacked much distinct taste, the tangy cream cheese frosting definitely made up for it. As for the apple spice, while getting bonus points for the tasty candied walnuts on top , it seemed as if a single spice overwhelmed the rest (ginger, maybe?). I was really prepared to love the s'mores but unless you get a bite with the tiny sprinkling of graham on top, it might otherwise be difficult to tell what kind of cupcake this was. However, this one earns back points for the most moist cake of the group, as well as the surprise marshmallow filling. Having read my previous posts I know you'll say I'm biased, but the pumpkin spice cupcake was my favorite of the group. The cake was soft and spongy, the combination of spices was well-balanced and the cream cheese frosting was the perfect combo. To top it all off, the cake is crowned with a small piece of pepita brittle, which was delicious even on its own.
Overall, I think More's definitely merits a visit after a long day of shopping, particularly for one of the most extensive and unique rotating daily menus I've seen. Cupcakes will set you back $3.50 each or $9.50 for a "flight" of 6 minis.

If you go
More
1 E. Delaware Place
Chicago, IL 60611
Tues-Fri 8am-8pm
Saturday 9am-8pm
Sunday 10am-6pm

Tuesday, October 13, 2009

Liberty and Pumpkin Mousse For All!

America has hit a new low. This year, many Americans will not be able to receive the basic products that they have come to rely upon year after year. Services they have come to take for granted will be in short supply. This Thanksgiving, many children may go without. No, I'm not talking about health care. I'm talking about the Great American Canned Pumpkin Shortage of 2009.

When I first heard rumors of a shortage, I scoffed. "Ha!" I said. It seemed inconceivable that something as traditionally American as pumpkin pie might be hard to come by at Thanksgiving. But I'm not laughing now. Week after week I've gone to several local supermarkets only to come face to face with an empty shelf where the canned pumpkin pie filling should be (to the right of the fruit pie fillings, and just underneath the instant pudding). It seems that, due to bad weather, many of last year's pumpkins were deemed "unacceptable" and now we're feeling the pinch. To make matters worse, the Libby company has placed supermarkets on a quota system in an attempt share the wealth. Clearly, it is not working. While my mother assures me that there is still plenty of pumpkin to be had at her regular grocery store in Ohio, my recommendation to you would be to BUY! BUY NOW!! if you happen to come across any cans and think you'll need them later in the season.

While Libby is assuring customers that more cans are coming, in the meantime I'm hedging my bets. It seems that cans of plain pumpkin are a little easier to come by so, of course, I bought the last two 30-oz cans I could find. By adding sugar and spices to the plain pumpkin, you can essentially make your own pumpkin pie filling. I plan to freeze this in small batches to use for future recipes and hopefully stretch my supply until the pumpkin drought is over. For the pumpkin mousse below, I've included the recipe as-written to include pre-mixed pie filling, but I'll also include my recipe for adding your own sugar and spice below in case you're unfortunately in the same pumpkin-less boat as me. Of course, if you're feeling adventurous, you can always bake your own pumpkin, scoop out the flesh, process in a blender and substitute for canned. Let me know how that goes :)


Pumpkin Mousse in Cinnamon Pastry Shells
2 boxes (10 oz each) frozen puff pastry shells
3 Tbs melted butter
Cinnamon sugar
(1 Tbs sugar, 1/2 tsp ground cinnamon)
1 can (30 oz) pumpkin pie filling (not plain)
1 box (3.4 oz) vanilla instant pudding and pie mix
2 tsp ground cinnamon
1 cup whipped topping, thawed

1. Preheat oven to 400 degrees.

2. Place pastry shells on a baking sheet. Brush tops with butter and sprinkle with cinnamon sugar. Bake according to package directions. Cool to room temperature. Remove tops and reserve for garnish. Remove soft pastry inside shells and discard.

3. Beat pumpkin pie mix, pudding mix and cinnamon in large mixing bowl on medium speed for 2 minutes. Gently fold in whipped topping. Spoon or pipe about 1/3 cup pumpkin mousse into each pastry shell. Top with pastry tops, dust with cinnamon or drizzle with caramel if desired. Serve immediately.

Pumpkin Pie Filling Mix
For each 30-oz can of pumpkin add:
2 cups granulated sugar or light brown sugar
2 tsp ground cinnamon 1/2 tsp ground nutmeg
1/2 tsp ground cloves
1/2 tsp ground ginger Stir thoroughly to combine and freeze in 1 cup portions. Makes 4 1-cup servings or enough for 1 pie.

Thursday, October 8, 2009

Wreckless

Everybody has one. That one haunting cake from their past that didn't turn out quite as expected. After the excitement of picking out their favorite Disney-themed birthday cake or describing in detail their dream wedding cake, happily driving to the bakery the morning of the big event, slowly opening the smooth, white bakery box in anticipation only to discover....

This.

This is my family's "Cake Wreck." A cake that will live in infamy. Possibly for as long as this Barbie seems to have laid in a tanning bed. Yes, in fact the peroxide blonde Medusa-haired, tanorexic mess on the cake is actually supposed to be the Barbie depicted on the party plates you can see underneath excited, 6-year-old me.

Fortunately, this is pretty tame compared to most of the unintentionally hilarious cake photos submitted by readers to Jen Yates' blog "Cake Wrecks: When Professional Cakes Go Horribly, Hilariously Wrong." An online gallery devoted entirely to "deformed, distasteful and bizarrely decorated wedding and birthday cakes," Cake Wrecks features reader submissions in several categories like Creative Grammar, Literal LOLs and Mithspellings. If you haven't been to Jen's blog yet you Must. Go. Now. This is honestly the funniest blog I've found on the web though, I must warn you, it may not be office appropriate. Not because of the content, but rather because it may cause you to snort uncontrollably while you try to hold in your laughter in an office environment. Of course, your office may be an uncontrollable snort-friendly kind of place, in which case, have at it. Just to give you a small taste, here are a few of my all-time faves:


Gross. The sign just makes it so much worse.

That's what you get for being specific:

Um, what?


First, the wedding cake inspiration:
What was delivered:

Anyways, all of this is to say that now Jen has released a brand new Cake Wrecks book cataloging some of the great wrecks from the site as well dozens of never-before-seen masterpieces, so now you can guffaw freely at home pouring over its pages instead of trying to chortle quietly to yourself in the office. The book has the great pics and hilarious captions we've come to love from the site and this would make a great gift for anyone you know that's a fan of baking, decorating, or laughing at the misfortune of others. If you get a chance also be sure to check out Jen on her world tour where you may also find recreations of some of the best-loved wrecks from the blog.

Sunday, October 4, 2009

Snickerdoodle Dandy

So I've decided to ease into my "spicy" fall recipe extravaganza slowly by starting with a recipe that highlights just a single spice: cinnamon. I was instantly intrigued when I came across this recipe for Snickerdoodle Pie from Better Home & Gardens because it seems simple and homey yet comforting in the way that fall food always is. And, I mean, who doesn't love Snickerdoodles?
Even though it's assembled like a pie, this dessert puffs up just like its cookie namesake.

I also decided to pair this pie with a jarred caramel sauce and a quick cinnamon whipped cream. I'm totally pushing the cinnamon whipped cream this fall because it pairs with everything and is possibly the easiest way ever to impress your friends :) Also a note, the cinnamon syrup that tops this pie is delicious on its own and you may want to make up a couple of extra batches just to put on apple pie or vanilla ice cream or just about anything else you have in the house. It's that good.

Oh, and on a personal note...This is my 50th blog post! Hurray for me and a HUGE thanks to all of my readers out there!

Snickerdoodle Pie
1 recipe of your favorite pie crust
or 1 rolled, refrigerated unbaked pie crust
1 Tbs sugar
1/2 plus 1/4 tsp cinnamon, divided
2 tsp butter, melted
1/2 cup packed brown sugar
1/4 cup butter
3 Tbs water
2 Tbs light corn syrup
1/2 plus 1 tsp vanilla, divided
1/4 cup butter, softened
1/2 cup sugar
1/4 cup powdered sugar
1 tsp baking powder
1/4 tsp cream of tartar
1/2 tsp salt
1 egg
1/2 cup milk
1 1/4 cups all-purpose flour

1. Preheat oven to 350 degrees. Prepare pie crust and line 9-in pie plate. In a bowl combine 1 Tbs. sugar and 1/2 tsp cinnamon. Brush melted butter over pie crust and sprinkle with 1 tsp of cinnamon sugar mix, set aside. (Reserve remaining cinnamon sugar).

2. For syrup, in a small saucepan combine brown sugar, 1/4 cup butter, water, corn syrup and 1/4 tsp cinnamon. Heat to boiling over medium heat, stirring to dissolve sugar. Boil gently for 2 minutes. Remove from heat, stir in 1/2 tsp vanilla and set aside.

3. In a mixing bowl, beat 1/4 cup softened butter with an electric mixer for 30 seconds. Beat in sugar, powdered sugar, baking powder, salt and cream of tartar until well combined. Beat in egg and 1 tsp vanilla. Gradually beat in the milk until combined. Beat in flour. Spread evenly in crust-lined plate.

4. Slowly pour syrup over the filling in the pie plate, sprinkle with remaining cinnamon sugar. Cover edges of the pie with foil and bake 25 minutes. Remove foil and bake about 20 minutes more or until top is puffed and golden brown. Cool 30 minutes on a wire rack and serve warm.

Cinnamon Whipped Cream
8 oz whipping cream
1/8 cup powdered sugar
1 tsp vanilla
1/4-1/2 tsp cinnamon depending on taste

1. Using an electric mixer, beat cream at medium speed until fluffy and thick, about 2 minutes.
2. Add remaining ingredients to taste and mix until combined.

That's it!! I told you it was easy.